Category Archives: Accessibility

When everybody plays, we all win

Microsoft’s Super Bowl commercial highlights the impact of accessible technology. It’s about video games, not college websites, but it shows why this work matters. Let’s continue to make accessibility a priority so that everyone can be included.

Video Captioning and Audio Descriptions

Augsburg, as part of the Associated Colleges of the Twin Cities (ACTC), has entered into a joint services agreement for closed captioning services with Automatic Sync Technologies. In this agreement, Augsburg receives a 12% discount from the educational organization rate, and a 20% discount compared to non-educational organizations.

In addition, Automatic Sync offers the ability to embed the video directly into Moodle or another web page, without having to upload your video to YouTube or Vimeo (although that is still an option).

Here is their pricing by service.

Captioning and Transcription: English, Spanish, or French Per Minute
Pay as you go. 4 business day turnaround $2.15
2-3 business day turnaround +$0.10
1 business day turnaround +$0.74
8 hour turnaround +$1.34
Tier Two* English captioning and transcription (see description below) $1.79

*Tier Two captioning and transcription utilizes a smaller pool of junior transcribers. Turnaround time depends on the amount of content, but will typically be between 4 and 10 business days. It is available only for english content, and there are no domain expertise options for this tier. Content with challenging subject matter or difficult audio is not suitable for Tier Two and must be submitted using one of our standard service tiers.

Audio Description Services Per Minute
English, 4 business day turnaround $9.50

For more information, or to request services, contact:

Margaret Alexandra
Automatic Sync Technologies
(877) 278-7962 x715
alexandra@automaticsync.com

Or see my Video Accessibility Checklist (Google Doc) for information on when captions and audio descriptions are needed, what they do, and how they should be formatted.

Customize your accessibility settings in Siteimprove

Siteimprove’s Accessibility features are the main reason we’re using it, but as a content manager, not all of the issues it finds will apply to you. For that reason, I have arranged the issues into different categories, and put the ones you can fix in the category of Editor. Siteimprove will also show you AAA issues, but we only need to conform to AA standards (which include A).

Whenever you go to the Accessibility > Issues page in Siteimprove, make sure you filter the issues so that you only see the issues that apply to you.

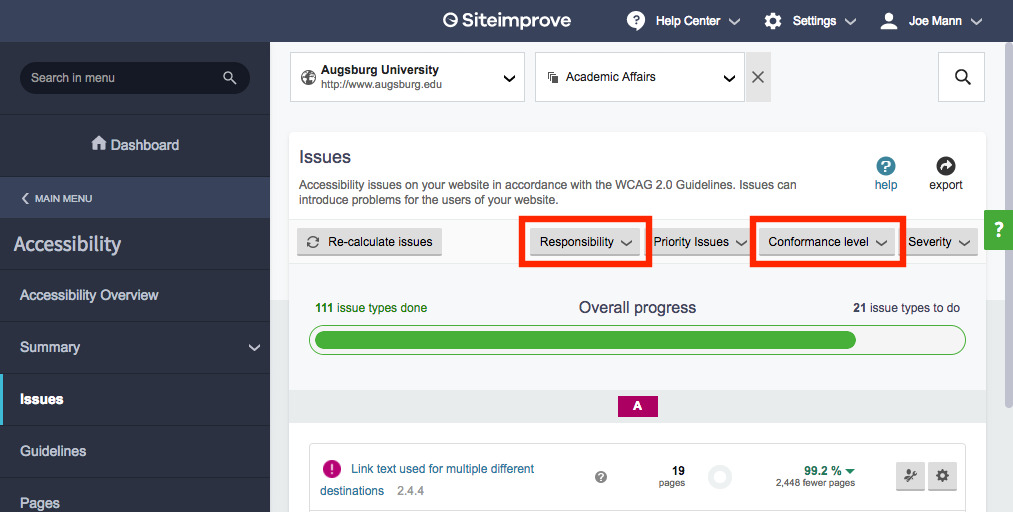
  1. In the “Responsibility” tab, select “Editor”
  2. In the “Conformance level” tab, select “AA Conformance”

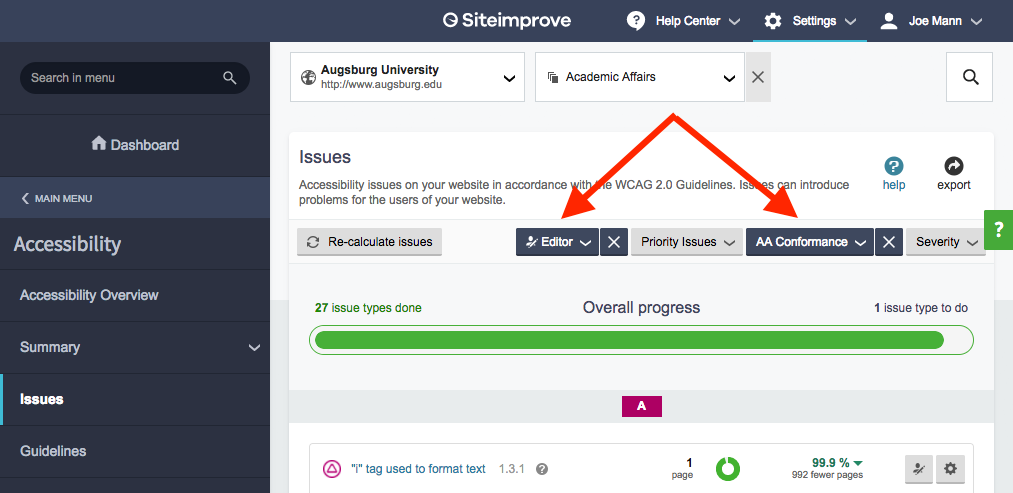
the Responsibility and Conformance filters are not set the Responsibility filter is set to "Editor" and Conformance filter is set to "AA"

This is what your screen should look like when you have those filters selected. What you will see is a much more manageable list of errors for you to address.

Now bookmark this page so you don’t have to change those filters every time.

For more on Siteimprove, see my previous post on Siteimprove.

Siteimprove

Siteimprove

For the past several months, I have been using Siteimprove to find errors on Augsburg websites. Now we are opening up Siteimprove to all content managers. While Siteimprove helps us find website content errors, such as misspellings or broken links, our primary reason for investing in it is the powerful Accessibility tool, which provides us with a simple way to identify accessibility issues on our web pages. As a content manager, you are already responsible for making your content comply with accessibility standards, and correcting any errors on your web pages. Siteimprove is simply a way to help you find what needs to be fixed, and a way to create greater accountability for all of us involved in website content management.

How to access Siteimprove

Once I have set up your access, you can log into Siteimprove using your Augsburg credentials at go.augsburg.edu/siteimprove. Make sure to bookmark this link for easy access later.

Quality Assurance

In the “Quality Assurance” area, you will see broken links and misspellings that Siteimprove found your pages. Here’s a helpful tip: when fixing broken links, it might be more helpful to view the “Pages with Broken Links.” This is an option under “Links” in the left hand menu. See the “Quality Assurance” section of the Getting Started for New Users page.

Accessibility

In the Accessibility area, pay attention primarily to issues that are in the “Editor” category. These are the ones you will most likely be able to fix yourself. Errors in the “Webmaster” or “Developer” categories may require assistance from me. If you run into an error you cannot correct, it may be something I need to change in the website template. Contact me when that happens. See the “Accessibility” section of the Getting Started for New Users page.

Updating Siteimprove reports

Siteimprove scans our websites every five days, so this is how frequently the information in Siteimprove will update. Once you make a correction on the website, you do not need to take any action in Siteimprove. However, you do have the option to force Siteimprove to “recheck” an individual page immediately.

You will also receive reports by email. Make sure to immediately address any issues that show up in those reports

Training

Siteimprove has extensive online tutorials that. After you first log in, visit the Getting Started for New Users page to get an introduction. Spend some time looking around and familiarizing yourself with the system. Don’t worry, you can’t break anything!

I will also be doing some in-person help sessions for Siteimprove. See the schedule. These are optional, but I would encourage you to attend. I’ve scheduled a handful of trainings now as everyone is getting onboarded, and I plan to offer them periodically after that.
Accessibility Guidelines

Making your website accessible is easy with WordPress. Most of the work is already done for you, in the technical design of the website, but some of it is up to you. Here are the main things you need to:

  1. Use Headings instead of bolded text
    • If you write a heading , highlight it, and click the “B” to bold it, then you have created a bold text that simulates a heading but is not technically a heading. Instead, use the options Heading 2 or Heading 3. Continue reading

Alt Text

How to set the alt text for an image

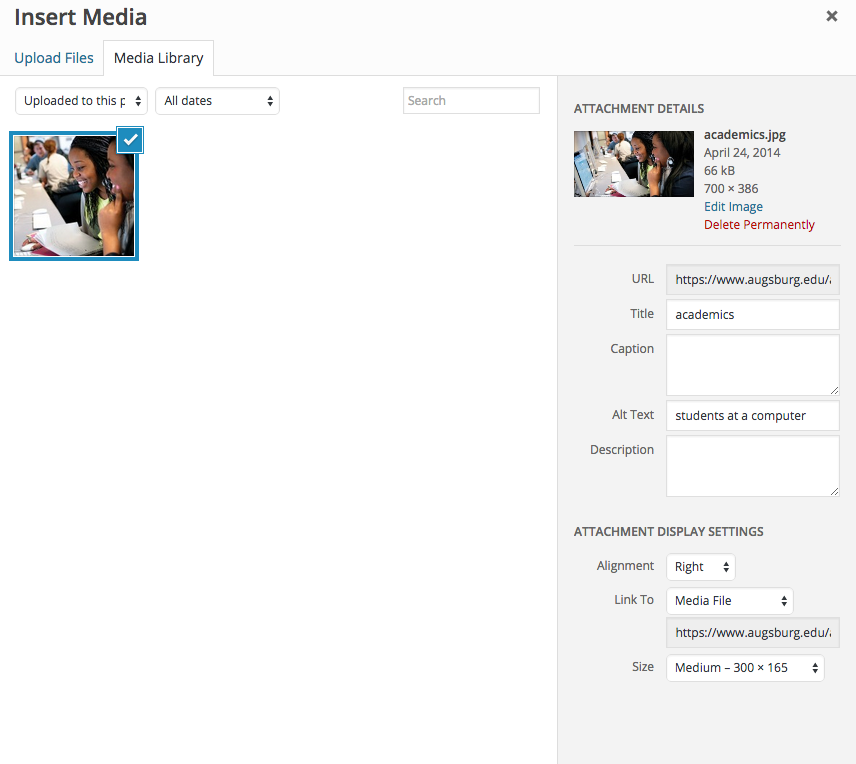
When you upload an image or are selecting an image to embed, the screen looks like this. See the “Alt Text” field on the right.

Or if you are editing an image already embedded on your page, the screen looks more like this, and you can see the “Alternative Text” field in the top center. Continue reading